|
|
| SURFACE PYROTECHNICS AND PROJECTORS |
| Chapter 7 - GROUND PYROTECHNICS |
| Hand Illuminating Grenade Mk 1 |
|
135. Hand Illuminating Grenade Mk 1 is used for illuminating areas in nigth operations. It is similar in size and weight to the fragmentaion hand grenade, and may be fired by hand launching or throwing, or by rifle or carbine, provided the small arms are equipped with Adapter, Grenade Projection, M1. The hand illuminating grenade burns for 25 seconds with approximately 55,000 candlepower. It consists of two steel cups joined together by force fit and sealed with Petman Cement to provide water-proofing. |
|
The upper half of the grenade body contains a fuze of the Bouchon Type (see Fig. 56), which is similar in action to that used in the fragmentation hand grenade. A safety lever is held restrained in safety position by a safety pin, the pin being removed just prior to launching and while the lever is held firmly against the side of the body of the grenade. The body of the grenade is 4.3 inches long and has a maximum diameter of 2.1 inches. The lower half contains the illuminating compound and a charge of black powder, which is ignited by the primer flash. On release of the safety lever the delay unit is ignited, and after a delay of seven seconds the grenade body is blown apart and the pyrotechnic is ignited. |
|
Figure 56. – Hand Illuminating Grenade Mk 1 |
|
|
|
Hand Operation |
|
136. To launch Hand Illuminating Grenade Mk 1 by hand, hold it firmly in the throwing hand, with the safety lever firm against the side of the grenade body. When ready to throw, withdraw the safety pin with the other hand. Still holding the safety lever firm against the side of the grenade body, draw the throwing arm back and then throw the grenade. The safety lever must not be released until the grenade leaves the throwing hand. |
|
Rifle Launching |
|
137. When launching Hand Illuminating Grenade Mk 1 from a rifle or carbine, case must be taken to use the proper rifle or carbine, care must be taken to use the proper rifle or carbine and the prescribed combination of launcher and cartridge. The following combina-tions may be used: |
|
RIFLE OR CARBINE |
GRENADE |
CARTRIDGE |
|
Rifle, U.S., Cal.
30, M 1903 and M |
Launcher M1 |
Cartridge, Rifle Grenade, Cal. 30, M3 |
|
Rifle, U.S., Cal. 30, M 1917 |
Launcher M1 |
Cartrdige, Rifle Grenade, Cal. 30, M3 |
|
Rifle, U.S., Cal. 30, M1 |
Launcher M1 |
Cartridge, Rifle Grenade, Cal. 30, M3 |
|
Carbine, Cal. 30,
M1, M1A1 or |
Launcher M8 |
Cartridge, Grenade Carbine, Cal. 30, M6 |
|
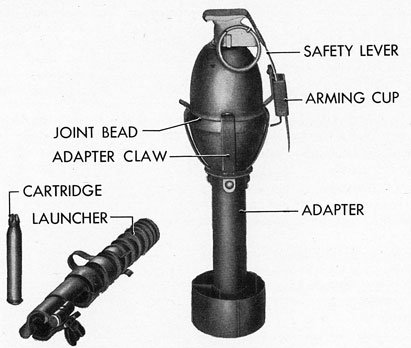
Figure 57. – Adapter, Launcher, and Cartridge for use with Hand Illuminating Grenade Mk 1 Mod 0 |
|
|
|
In launching the grenade by rifle or carbine, take the following steps: |
|
(a) Place the grenade in the adapter by inserting the safety lever into the arming cup and forcing the joint bead of the grenade between the claws of the adapter, Fig. 57. |
|
(b) Place the adapter, with grenade, on the launcher and position it in accordance with the desired range; see range table. |
|
(c) Rotate the adapter on the launcher so that the safety lever is down or to one side of the sight. |
|
(d) Open the bolt and insert the cartridge in the magazine, taking care that it is the pro-per cartridge for the rifle or carbine to be used. |
|
(e) Close the bolt and aim the rifle or carbine at the target; then elevate the barrel to an angle of 45 degrees and fire |
|
(f) It is recommended that the butt of the rifle or grenade be rested on the ground or a sutibale buttress. Do not fire the rifle from the shoulder when in the prone position, or in other positions that do not permit the body to move and absorb the recoil. |
|
(g) Varying range may be obtained by using a positioning clip on the launcher, or on the rifle or carbine when either of the latter is held at varying elevation. The following table may be used for reference: |
|
RANGE IN YARDS |
ENGAGEMENT ON |
ELEVATION OF BARREL |
||
|
90 |
5 rings show |
45 degrees |
||
|
100 |
4 rings show |
45 degrees |
||
|
115 |
3 rings show |
45 degrees |
||
|
140 |
2 rings show |
45 degrees |
||
|
160 |
1 ring show |
45 degrees |
||
|
285 |
0 ring show |
45 degrees |
|
(h) When firing without using the position clip, the following table may be used as a guide: |
|
RANGE IN YARDS |
ELEVATION OF |
GRENADE POSITION ON BURSTING |
||
|
205 |
15 degrees |
Ground |
||
|
220 |
20 degrees |
Ground |
||
|
240 |
25 degrees |
Ground |
||
|
260 |
30 degrees |
Ground |
||
|
280 |
35 degrees |
10 feet altitude |
||
|
285 |
40 degrees |
10 feet altitude |
||
|
280 |
45 degrees |
20 feet altitude |
||
|
240 |
50 degrees |
25 feet altitude |
||
|
215 |
55 degrees |
50 feet altitude |
||
|
200 |
60 degrees |
75 feet altitude |
||
|
160 |
65 degrees |
100 feet altitude |
||
|
116 |
70 degrees |
125 feet altitude |
|
Both the tables above are computed for use with Rifle, U.S. Cal. 30, M1903 only. At ran-ges of less than 160 yards the use of the positioning clip is recommended, so that the grenade will burst on or near the ground. |
|
Packing |
|
138. Hand Illuminating Grenade Mk 1 is packed in an individual bag of laminated cellopha-ne, heat sealed at both ends so as to be waterproof. Each such package is then packed in a mailing tube container. Twenty-five such containers are shipped in a wood box. |
|
Storage |
|
139. General rules for storing pyrotechnic ammunition as outlined in paragraphs 19 to 12, inclusive, apply to Hand Illuminating Grenade Mk 1. These grenades must be protected from excess moisture and should not be subjected to direct rays of the sun. Faulty or deteriorated grenades should be disposed of as in paragraph 17. |
|
Safety Precautions |
|
140. When using Hand Illuminatin Grenade Mk 1 on soggy or swamp land, it may embed itself and result in little, if any, illumination. This is a physical limination of the item and should be born in mind. Other precautions to be taken with it are as follows: |
|
(a) As the grenade bursts with considerable force, it must be fired to that it explodes more than ten feet from the nearest friendly personnel. |
|
(b) The pyrotechnic candle burns with a hot flame and will ignite dry leaves or straw. |
|
(c) Once the grenade has been inserted in the adapter, it must not be removed without first re-inserting the safety cotter pin. |
|
(d) When hand launched, the grenade must be thrown immediately after the safety cot-ter pin is removed. |
|
|