|
|
| SURFACE PYROTECHNICS AND PROJECTORS |
| Chapter 7 - GROUND PYROTECHNICS |
| Flare, Trip, M49 |
|
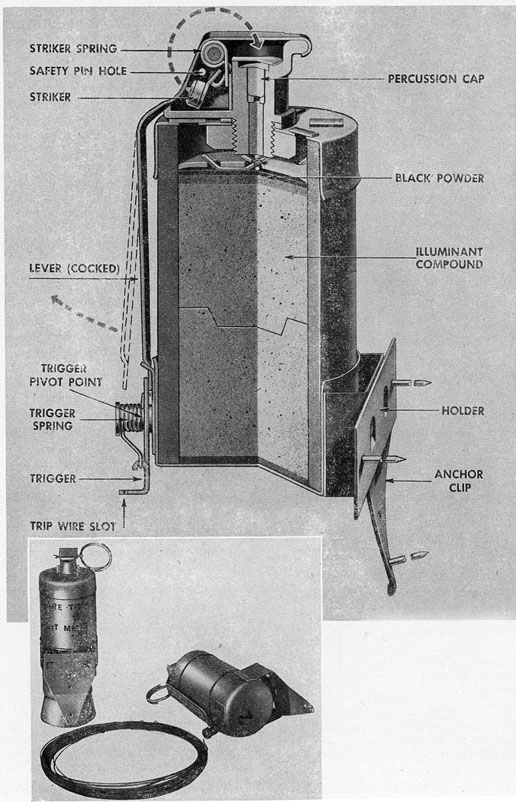
130. Trip Flare M49, designated as above, resembles a hand grenade in size and shape, but is subject to instantaneous ignition, instead of delayed action as are hand grenades. It is used as a warning and illuminationg signal to detect or combat marauding or infiltra-ting enemy troops. The flare consists of a cylindrical body of laminated paper, 2.5 inches in diameter and 3.8 inches long, closed at both ends by metal caps. The percussion cap, striker and safety lever, and pin protrude from the head, the safety lever extending around and down the side of the body to the trigger. See Fig. 55. The flare is mounted on a stale, post, or tree by means of a hold plate and anchor clip in which three keyhole slots fit over nail heads on the object to which it is attached. When the safety pin is pulled with the safety lever cocked in safety position by the spring loaded trigger, the trigger must be in the vertical position. The flare is fired when the tripper is thrown out of the vertical position, either by a pull on the trip wire sending it one way, or a cutting of the wire allowing the spring to go the other way, releasing the safety lever. The flare burns with approximately 40,000 candlepower. |
|
Figure 55. – Trip Wire Flare M49 |
|
|
|
Operation |
|
131. Trip Flare M49 is mounted on a stake, post, or tree, to the right of the field or area to be illuminated, when looking toward the enemy. It is mounted between 15 and 18 in-ches from the ground by placing three nails in the post, stake, or tree, and leaving the nail heads extended so that they will fit into the keyhole slots in the mounting plate. Then take the following steps: |
|
(a) Attach the trip wire to a rigid object approximately 40 feet to the right and 15 to 18 inches above ground when facing the flare. |
|
(b) Loosen the thumb nut on the trigger. Press the safety lever on the fuze against the body of the flare and rotate the trigger counterclockwise against the spring, until the thumb nut is down at six o'clock and the finger at the other end of the trigger restrain the fuze lever. |
|
(c) Pull the trip wire until it does not sag, and wrap it once around the thumb nut. Then tigthten the thumb nut. At this point the trip wire should not sag and the trigger should be vertical. Have the fuze lever restrained by its upper end, so that it will continue to hold the lever after the safety pin is withdrawn. |
|
(d) Holding the safety lever with one hand, carefully withdraw the safety pin from the fuze, making certain that the trigger will not turn and fire the flare. |
|
(e) Should it be necessary to remove the flare, reverse the steps above. |
|
Packing |
|
132. Trip Flare M49 is packed in wood boxes containing 16 flares, each with three nails and a 45-foot length of olive drab colored trip wire. Each flare is marked to indicate the type and model, lot number, manufacturer's initials, and date loaded. |
|
Stowage |
|
133. General rules for storing pyrotechnic ammunition as outlined in paragraphs 9 to 12, inclusive, apply to Trip Flare M49. |
|
Safety Precautions |
|
134. In addition to the operation instructions in paragraph 131 above, the following safe-ty precautions should be taken when using or setting Trip Flare M49: |
|
(a) In regular installations, the safety pin of the fuze is removed only after the flare is in place and adjusted sot that the trigger restrains the safety lever. |
|
(b) When used as a hand grenade, the pn may be removed only while the safety lever is held restrained by the throwing hand, and care must be taken to keep the lever restrai-ned until the flare is thrown. |
|
(c) The incendiary characteristics of Trip Flare M49 must be continuosly borne in mind. |
|
|