|
|
| DEPTH CHARGES MARK 6 and MARK 7 |
| PART II |
| CHAPTER VI - REPAIRING AND OVERHAULING |
|
OVERHAUL FIRING PLUNGER AND GUIDE TUBE |
|
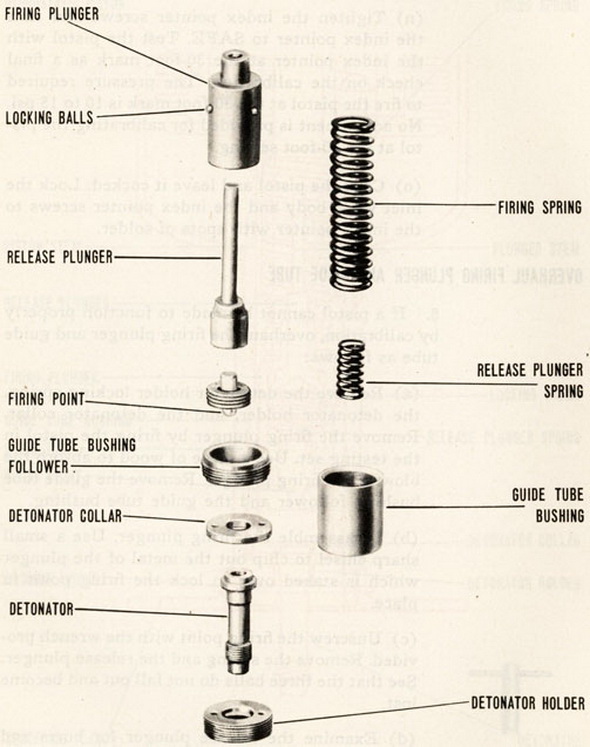
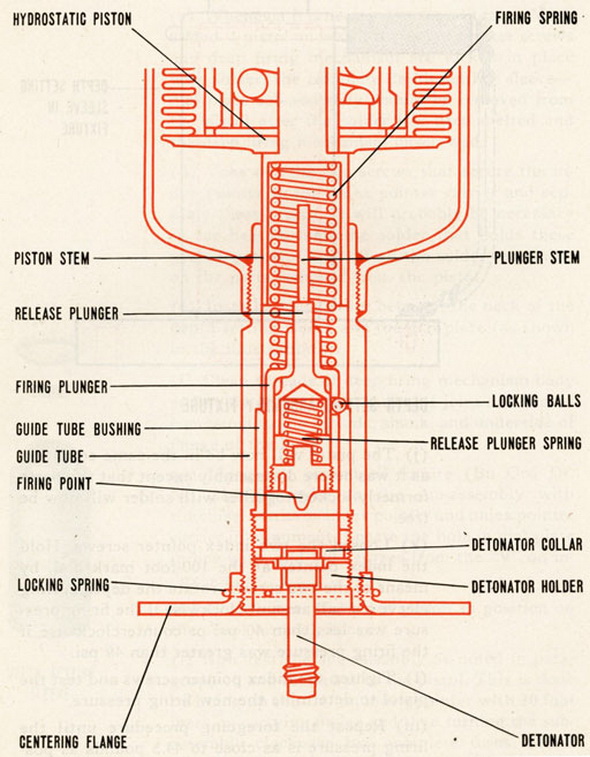
8. If a pistol cannot be made to function properly by calibration, overhaul the firing plun-ger and guide tube as follows: |
|
(a) Remove the detonator holder locking spring, the detonator holder, and the detonator collar. Remove the firing plunger by firing the pistol in the testing set. Use a piece of wood to absorb the blow of the firing plunger. Remove the guide tube bushing follower and the guide tube bushing. |
|
|
(b) Disassemble the firing plunger. Use a small sharp chi-sel to chip out the metal of the plunger which is staked over to lock the firing point in place. |
|
(c) Unscrew the firing point with the wrench provided. Remove the spring and release plunger. See that the three balls do not fall out and become lost. |
|
|
(d) Examine the release plunger for burrs and ball inden-tations. If the plunger is an any way defective and can-not be reconditioned readily, replace it with a new one. |
|
|
|
(e) Place the release plunger in position in the firing plunger and test it for freedom of motion, up and down and turning. If there is binding, use a fine file to remove any burrs on the release plunger. Do this until the release plunger moves freely in the firing plunger. Do not increase radius of ball release shoulder. This radius is cirtical and should be 0.02 inches, maximum. |
|
(f) Examine the balls to see that they are in good condition. If they are peened in their sockets thight enough to bind the release plunger, push them outward until the release plunger is free. Clean the release plunger and firing plunger after working on them. |
|
(g) Examine the guide tube bushing and see that the inside edge, where the firing plun-ger balls rest, is in good condition. If there is any doubt about the condition of the guide tube bushing, replace it with a new one. |
|
(h) Reassemble the guide tube bushing and firing plunger and test its operation as direc-ted in Chapter V, paragraph 6. |
|
|
|
(n) Tighten the index pointer screws and turn the index pointer to SAFE. Test the pistol with the index pointer at the 30-foot mark as a final check on the calibration. The pres-sure required to fire the pistol at the 30-foot mark is 10 to 15 psi. No adjustment is pro-vided for calibrating the pistol at the 30-foot setting. |
|
(o) Cock the pistol and leave it cocked. Lock the inlet valve body and the index pointer screws to the index pointer with spots of solder. |
|
|