|
|
| U.S.N.B.D. - BRITISH LAND MINES AND FIRING DEVICES |
| FIRING DEVICES |
|
|
|
|
|
WIDTH |
1-1/2 in. |
BRITISH SWITCH |
|
HEIGHT |
1-1/6 in. (armed) |
NO. 2
|
|
LENGTH |
4-5/8 in. (with fuse | |
|
|
adapter) | |
|
WEIGHT |
6 oz. | |
|
MATERIAL |
Brass |
Mk I |
|
PRESSURE REQUIRED |
30 - 40 lbs. | |
|
COLOR |
Olive drab. |
(SERVICE) |
|
|
||
|
|
(For Mk II, see REMARKS below) |
|
|
|
||
|
USE: |
|
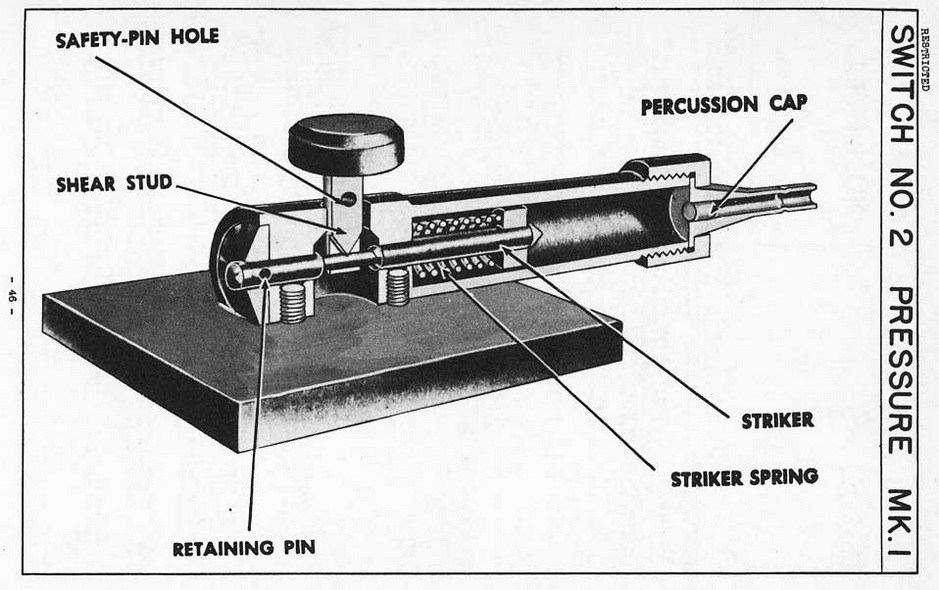
This switch is used under boards, door-mats, etc., in booby trap installations where initiation by pressure is desired. The switch may also be used to initiate demolition charges. |
|
DESCRIPTION: |
|
The switch conists of a housing tube mounted on a rectangular base plate. Inside the housing tube is located a spring-loaded striker, one end of which passes through the head of the housing tube and is secured by a transverse pin recessed into the end of the head. An annular groove in this striker is straddled by the milled out end of a shearing stud which is inserted through a hole in the top of the housing tube and enga-ges the striker with a chisel edge. A flat disc-shaped pressure head is located on the top of the shearing stud. A threaded collar is screwed over the top end of the housing tube for attachment of the cap holder. |
|
A safety pin may be inserted through the shearing stud above the housing tube, pre-venting the shearing stud from being forced downward. |
|
FUNCTIONING: |
|
Pressure on top of the pressure head will cause the V-shaped cutting edge of the shear stud to break the striker spindle. The striker, driven foward by the spring, fires the percussion cap. |
|
INSTALLING & ARMING: |
|
Remove the pressure cap from the base plate, to which it is attached during trans-port. Insert the pressure cap through the hole in the top of the housing tube, and posi-tion it to straddle the striker. If properly placed, the pressure cap cannot be rotated. Make certain safety pin is securely in position. Connect charge to the fuse adpater with instantaneous fuse. Reattach the collar and the fuse adpater, and gently remove the safety pin. If desired, a No. 8 detonator can be slipped directly into the fuse adapter, and connection made to the charge with Cordtex. |
|
DISARMING: |
|
Insert a safety pin in the safety pin hole in the pressure cap. Lift the pressure cap out of the housing tube. Cut the length of fuse connecting the switch to the charge. Remove the fuse adapter. |
|
REMARKS: |
|
1. To test this switch prior to re-use, remove the fuse adapter and make certain that the striker is in the cocked position. If the striker spindle has been sheared, the striker will fall out of the housing tube, and the switch cannot be re-used. |
|
2. A special electric adapter (See page 45) is supplied to enable this switch to be used for electric firing, if so desired. |
|
3. No. 2 Pressure Mk II: The Mk II switch is almost identical with the Mk I, the prin-cipal difference being the fact that the base plate and housing tube are cast in one piece in the Mk II, while in the Mk I they are fastened together with two screws. Also in the Mk II, the hole in the housing tube for the insertion of the pressure cap is surround-ed by a raised collar which contains a rubber washer. The safety pin pierces not only the shearing stud, but the collar and washer as well. The Mk II is issued with the pres-sure cap in place in the housing tube, rather than secured to the base plate. The alter-ations incorporated in the Mk II were designed to increase the washer resistance of the switch. |
|
|
|
|