|
|
| GERMAN MINE WARFARE EQUIPMENT |
| PART TWO – GERMAN MINE WARFARE EQUIPMENT |
| CHAPTER 6 - ANTITANK MINES |
| Section I. STANDARD ANTITANK MINES |
|
|
|
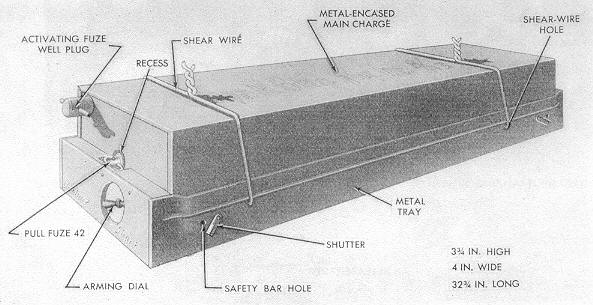
67. Bar mine (17.6-Pound) (Sprengriegelmine 8 Kilogram; Sp.R-Mi. 8
Kg; |
|
a. Description. The antitank bar mine (17.6-pound) (fig. 76) is similar to the bar mine 43, (par. 66), which superseded this mine, except that it has no steel lid and it has a diffe-rent type of arming device. This mine is 32 3/4 inches long, 4 inches wide, and 3 3/4 in-ches high. It consists of metal-encased main charge, weighing about 18 pounds. The main charge rests on two shear wire inside a metal tray. The mine uses two pull fuzes 42 (par. 42) which are modified by cutting off the end of the striker shaft and its outer hole. |
|
Figure 76. Bar mine (17.6-pounds) |
|
|
|
(1) |
Tray. |
|
(a) |
The tray is ribbed leghtwise slightly above the shear-wire holes. The under side of the tray is marked Unten (bottom). A shear wire is threaded through holes 4 inches from each end of the tray. About 1 1/2 inches from each end of the tray is another set of holes for the insertion of safety bars. The holes for the safety bars may be closed by small, hinged shutters. The ends of the tray are folded over on the top. One end is solid, and the other is slotted (fig. 77) to permit passage of the wings of the striker-retaining pin of the fuze. |
|
|
(b) |
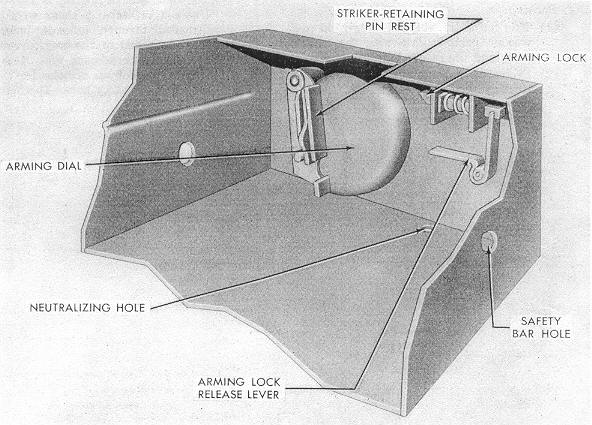
At both ends of the tray are pivoted arming dials which can be turned so the indicator points at the word scharf (armed) or unscharf (unarmed). In the un-armed position, the slotted striker-retaining-pin rest, attached to the inside face of the arming dial, is pivoted at a 90-degree angle, away from the fuze (fig. 77). This safeguards the mine against accidental firing if the shear wires are premetaurely sheared. In the armed position, the slotted striker-retaining-pin rest is brought di-rectly under the wings of the striker-retaining pin of the fuze and is locked in this position by the spring-loaded lock. The arming lock release lever is directly above the neutralizing hole in the bottom of the tray. |
|
(2) |
Main charge. The main charge is within a metal case which is recessed at both ends to receive the pull fuzes. Only the winged striker-retaining pins can be seen when the fuzes are screwed into the main charge. In the upper left-hand corner, at each end of the charge, is an activating fuze well which is closed with a metal plug when not is use. |
|
b. Employment. This mine is employed in the support of road blocks and in anti-tank mine fields. Because of its shape fewer rail mines are needed to blocks a road or to construct a mine field. |
|
Figure 77. Arming mechanism of the tray. |
|
|
|
c. Functioning. A pressure of 400 pounds at either end of the main charge, or 800 pounds in the center, shears one or both shear wires and forces the striker-retaining pin out of the striker shaft of one or both fuzes, releasing the spring-loaded striker against the percussion cap and firing the mine. |
|
d. Installing and Arming. |
|
(1) |
With a nail of stiff wire inserted through the neutralizing hole in the bottom of the tray, press up the arming lock release lever which pulls back the arming lock, re-leasing the striker-retaining pin rest. |
|
(2) |
Turn the arming dial, at each end, so that the arrow points to unscharf. |
|
(3) |
Insert the shear wires and the safety bars through their respective holes in the fuze. |
|
(4) |
Insert a pull fuze 42 into the fuze well at each end of the main charge, and turn them so the wings of the striker-retaining pins are up. |
|
(5) |
Slide one end of the main charge into the solid end of the tray and lower the char-ge so it rests on the safety bars and the shear wires. |
|
(6) |
Twist the shear wires together over the main charge so the charge is secure in the tray. |
|
(7) |
Turn the arming dials from unscharf (unarmed) to scharf (armed). This action rota-tes the striker-retaining-pin rests on the rear face of the arming dials so the reces-ses are positioned directly under the striker-retaining pins in the fuzes. The spring-loaded arming locks lock the striker-retaining-pin rests in position. |
|
(8) |
Remove the safety bars. |
Note. One or both of the striker-retaining pins may be reversed so the wings are down instead of up. This acts as booby-trap and will cause the mine to detonate if the main charge is lifted. |
|
e. Neutralizing. This mine should be destroyed in place or pulled out with a 50-yard rope or wire to a safe place and the destroyed. If neutralizing is necessary, proceed as fol-lows: |
|
(1) |
Check for and neutralize any activating fuzes. |
|
(2) |
Lift one end of the mine. |
|
(3) |
Insert a long stiff wire or a 6-inch nail into the safety-bar hole and push through the hole on the other side of the tray. |
|
(4) |
Repeat step (3) at the other end of the mine. |
|
(5) |
Carefully cut the shear wires. |
|
(6) |
Inspect the striker-retaining pins to see if the wings are on top of the recesses of the striker-retaining-pin rests. If they are both on top of the recesses of the rests, then insert a nail or stiff wire through the neutralizing holes in the bottom of the tray and press up the arming lock release levers, which pull back the arming locks, releasing the striker-retaining-pin rests; and turn the arming dials to unscharf (un-armed). If one pin is below the re-cess, do not turn that particular arming dial to un scharf. Instead, carefully lift the opposite end of the main charge and gently slide the charge out until the reverse fuze is clear of the recessed striker-retaining-pin rest. |
|
(7) |
Lift the main charge and unscrew both fuzes and their detonators. |
|
f. Packing. Mines are shipped singly in a wooden packing case with the main fuzes and the safety bars in position. |
|
|