|
|
| BRITISH EXPLOSIVE ORDNANCE |
| Part 7 - Chapter 2 |
| Firing Devices |
|
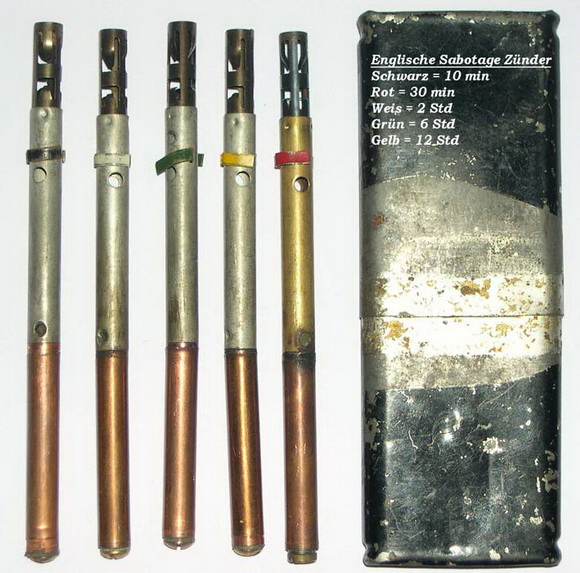
Time Pencil Switch No. 10 Mk I (Service) |
| Data |
|
Diameter |
5/16 in. |
|
Length |
5 in. |
|
Weight |
1½ oz. |
|
Material |
Aluminum and copper |
|
Color |
Unpainted |
|
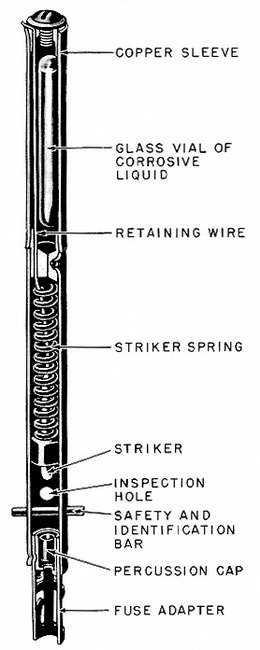
Description: This switch consists essentialy of a housing tube made up to two sect-ions: a thin copper sleeve containing a glass vial of corrosive liquid, and a thin aluminum sleeve, housing a spring-loaded striker retained by a retaining wire. This retaining wire is attached to the upper end of the striker and fastened to the top of the copper sleeve. A fuse adapter and percussion cap are crimped into the base of the switch, and a safety bar pieces the housing tube between the striker and the percussion cap. Inspection ho-les are provided just above the holes for the safety bar. |
|
Functioning: When the copper sleeve is crushed and the glass vial broken, the corro-sive liquid is allowed to attack the retaining wire. When this wire is eaten through, the striker spring drives the striker into the percussion cap. |
|
Use: This device is designed to explode a demolition charge by delayed action. |
|
Installing: Refer to the table included with each box of switches, and select the pro-per delay. Look through, or pass a nail through, the inspection holes to see that the stri-ker has not fallen and is not resting on the safety bar. Connect the explosive charge to the fuse adapter. A service detonator may be crimped directly over the adapter, or in-stantaneous or safety fuse may be used by crimping an adapter sleeve over the fuse adapter and crimping the fuse in sleeve. Crush the copper sleeve flat, without bending or fracturing the sleeve. Withdraw the safety strip. Do not leave the safety strip behind, as its color will indicate to the enemy the delay time of the switch. Always use two swit-ches for each important charge, to guard against risk of failure. |
|
Disarming: This switch cannot be disarmed safely. If it is essential to disarm it, insert the safety bar or a nail through the inspection holes, or cut the fuse connecting the switch to the explosive charge. After inserting the safety bar, remove the switch from the charge. |
|
Remarks: If you can see through the inspection holes or insert a nail htrough them, the striker is cocked. If the sleeve has been crimped, discard the switch. If the sleeve is intact, unscrew the cap to see wether the glass vial is intact. If so, the switch may be re-used. |
|
Thes times of delay are indicated by the colors of the safety bars. The following tab-le, subject to a 25% variation either way, shows the change of the delay times with the change in temperature: |
|
Temperature |
Red |
White | Green |
Yellow |
Blue |
|
-4° F. |
75 min. | 19 hr. | 3¼ days |
10 days |
– |
|
14° F. |
63 min. | 13 hr. | 2½ days |
5 days |
– |
|
32° F. |
43 min. |
5 hr. |
16 hr. |
28 hr. |
– |
|
50° F. |
31 min. |
2¾ hr. |
8 hr. |
18 hr. |
34 hr. |
|
59° F. |
27 min. |
2 hr. |
5¾ hr. |
12 hr. |
24 hr. |
|
68° F. |
23 min. |
1½ hr. |
4 hr. |
9 hr. |
20 hr. |
|
77° F. |
19 min. |
1¼ hr. |
3 hr. |
6 hr. |
15 hr. |
|
99½° F. |
12½ min. |
¾ hr. |
1½ hr. |
3 hr. |
6 hr. |
|
109½° F. |
9½ min. |
34 min. |
80 min. |
2 hr. |
5 hr. |
|
Do not use the switch with the blue delay if the temperature is likely to be below freezing when the explosion is due to occur. A switch with a black safety bar, having a ten-minute delay, is issued for training purposes only. |
|
In the original patterm (S.R.I.E.), which is now obsolete, the delay time was shown by means of colored stripes painted around the body of the switch. |
|
This device is issued only for special operations and for preparatory for these operat-ions. |
|
|
| Figure 276 – Time Pencil Switch No. 10 Mk I |
|
|
|
|
|
|