|
|
| BRITISH EXPLOSIVE ORDNANCE |
| Part 7 - Chapter 2 |
| Firing Devices |
|
Pull Switch No. 4 Mk I (Service) |
| Data |
|
Diameter |
7/16 in. |
|
Length |
3¾ in. |
|
Weight |
1¼ oz. |
|
Material |
Brass |
|
Pull required |
6 - 8 lb. |
|
Color |
Olive drab |
|
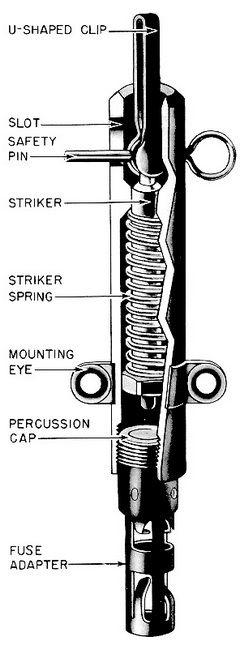
Description: This device consists of a housing tube with two mounting eyes attached externally to assist in attaching the mechanism to any convenient object. The housing tube has a fuse adapter screwed into one end, and contains a spring-loaded striker. A U-shaped clip, which grips the rounded end of the striker assembly, holds the striker in the cocked position. A safety pin passes through the housing tube and the rounded head of the striker. |
|
Functioning: A pull on the trip wire attached to the U-shaped clip will withdraw the clip and release the striker, which will then be forced by its spring into the percussion cap. |
|
Use: This device is intended primarily for use with a trip wire to fire booby-trap instal-lations. It may also be used to fire mines, flares, and demolition charges. |
|
Installing: To install this switch, unscrew the fuse adapter. Attach the switch to any desired object, and attach a trip wire to the U-shaped clip. Adjust the tension of the trip wire until the safety pin lies about half away along the slots in the body. Connect the charge to the fuse adapter with safety fuse, and screw the adapter into the end of the switch. Withdraw the safety pin. If there is too much tension on the trip wire, the safety pin will jam against the ends of the slots and prevent easy withdrawal. |
|
Disarming: If the device is accessible, insert the safety pin through the slot in the body and through the safety-pin hole in the ball end of the striker. Check both ends of the trip wire, and then cut the trip wire. Cut the safety fuse leading to charge, and re-move the fuse adapter from the switch. Remove the switch and charge. |
|
If the switch is inaccessible, cutting the connecting safety fuse will suffice. |
|
Remarks: To reset this switch, unscrew the fuse adapter, and push the striker back with a pencil as far as it will go. Use the safety pin to twist the striker around until the safety-pin hole is in line with the two slots in the body. Fit the U-shaped clip over the ball end of the striker, and allow the striker to move forward about ¼ inch. Insert the safety pin. Screw in a new fuse adapter with a percussion cap. |
|
This switch is used only for special operations and for preparatory training in these operations. |
|
|
| Figure 270 – Pull Switch No. 4 Mk I |
|
|
|
|