|
|
| BRITISH EXPLOSIVE ORDNANCE |
| Part 6 - Chapter 3 |
| Anti-Personnel Mines |
|
A./P. Shrapnel Mine Mks I and II |
| Data |
|
Diameter |
3½ in. |
|
Height |
5½ in. |
|
Total weight |
10 lb. |
|
Explosive weight |
1 lb. |
|
Explosive |
Amatol |
|
Material |
Steel |
|
Color |
Yellow |
|
Fuzing |
Special fuze |
|
Pull required |
4 lb. |
|
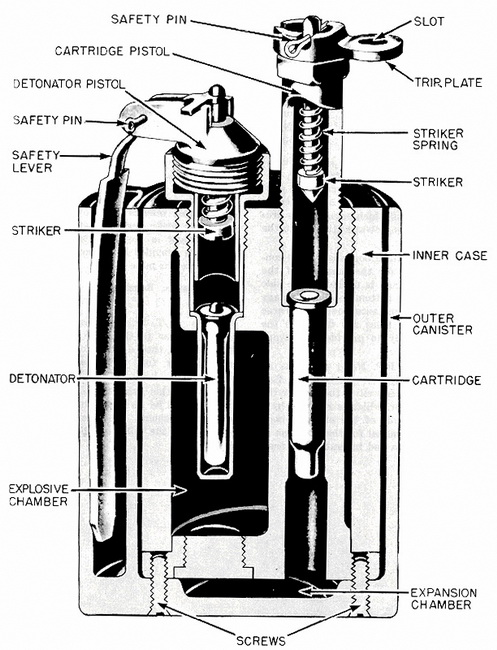
Description: The Mine Mk II consists of the following component parts: the outer mine canister, the inner case, the detonator-pistol mechanism, and the cartridge-pistol mechanism. |
|
The outer mine canister is nothing more than a container for the inner case and acts as a small mortar to propel the inner case into the air. The inner case rests on a shoulder in the bottom of the outer canister. Below this shoulder in the canister is a small recess acting as an expansion chamber for the propellant gases. A long recess is loacted on the outside of the canister to retain the lever of the detonator pistol. |
|
The inner case is a cylindrical container for the explosive charge. Two holes are loca-ted in the top of the inner case, one of which passes completely through the case for the insertion of the cartridge pistol, while the outer leads into the explosive charge for the insertion of the detonator-pistol mechanism. During normal shipment and storage, the inner case is held in the outer canister by two screws passing through the bottom of the canister into the case. These screws must be removed from the mine before it is laid. |
|
The detonator pistol is the actuating mechanism for the explosive charge of the mine. It consists of a cylindrical body containing a spring-loaded striker rertained by a small fork attached to the end of a long lever arm. The lever is held in the retaining position both by a safety pin and a long recess in the outer canister into which it fits. When the lever is released, the striker is forced by its spring into a detonator placed in a well be-neath the pistol. |
|
The cartridge pistol is the activating mechanism of the propellant charge of the mine. It consists of a cylindrical body housing a spring-loaded striker. This striker is retained by a fork-shaped trip plate, which fits under a shoulder on the top of the striker and above the top of the fuze body. A slot for attaching a trip wire is provided in the trip plate. A safety pin passes through the top of the striker and also through a groove cut in the trip plate. thus preventing the trip plate from being withdrawn. |
|
Functioning: A pull of four pounds or more on the trip wire will remove the trip plate from the cartridge pistol, allowing the striker spring to force the striker into the cartridge located beneath the pistol. The explosion of the ballistite cartridge provides the propel-lant force which throws the inner case into the air. When the inner case leaves the outer canister, the lever arm is released, freeing the striker in the detonator pistol, which then is forced into the detonator located below the pistol. The explosion of the detonator fires the main charge of the mine. |
|
Use: This mine is a bounding anti-personnel mine designed to cause casualties up to 30 yards. |
|
Assembly and Arming: First make certain that the two transit screws holding the inner case in the outer canister are removed. Unscrew the cartridge pistol with the span-ner provided. See that cartridge recess is clear and then insert the ballistite cartridge provided with each mine. Replace the cartridge pistol and make certain that the safety pin is secure. Remove the detonator pistol, making certain that the safety pin is in place. Inspect the socket to see that it is clear, and insert the detonator, small end first, so that the cap end rests on a shoulder in the socket. Replace the detonator pistol to that its firing lever engages in the recess on the outer canister. Make certain that the safety pin is secure. Place the mine in the ground and attach a loose trip wire to the cartridge pistol. Remove the detonator-pistol safety on, and then the cartridge-pistol safety pin. If the latter safety pin cannot be withdrawn easily, release the tension and reset the trip plate. |
|
Neutralization: Replace the cartridge-pistol safety pin, and then replace the detona-tor-pistol safety pin. Cut the trip wire, and disarm the mine by reversing the procedure for arming. |
|
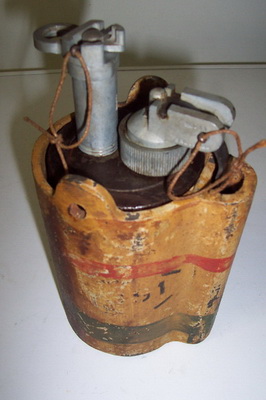
Remark: The Mine Mk I is the earlier issue of the shrapnel mine and differs from the Mk II in that the Mk I spring lever is shorter than that provided for the Mine Mk II, and the recess for it in the outer canister does no extend the full length of the Mine. The Mk I mine has a leather carrying strap. The detonator of the Mine Mk I has a slight delay action, while that of the Mk II is instantaneous. |
|
Before re-using a shrapnel mine, test it as follows: After disarming the pistols, lift the mine and examine externally. In removing the cartridge and detonator, not any tendency to stick. If either cartridge or detonator cannot be removed, discard the mine. Examine the cartridge and detonator for corrosion. Examine the empty pistol sockets, and cartrid-ge and detonator recesses for corrosion and wetting. The detonator socket particularly should be examined for blue or green incrustation. If found, discard the mine. Test some of the removed ballistite cartridges and detonators by firing separately. |
|
|
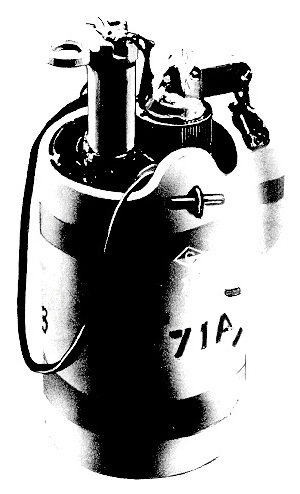
| Figure 260 – A./P. Shrapnel Mine Mk II |
|
|
| Figure 261 – A./P. Shrapnel Mine Mk I |
|
|
|
|