|
|
| Fuzes for Rockets and Projector Charge |
| Chapter 6 |
| NOSE FUZES FOR 7.2-INCH DEMOLITION ROCKETS |
| Section A - Nose Fuze Mk 149 Mod 0 (Setback and Air Arming, Impact Firing) |
| 1. General Data |
|
Used in: |
|
3.5-inch Rocket Head Mk 3 Mod 0 (General Purpose) |
|
3.5-inch Rocket Head Mk 5 Mod 0 (General Purpose) |
|
5.0-inch Rocket Head Mk 1 Mod 0 (General Purpose) |
|
5.0-inch Rocket Head Mk 5 Mod 0 (General Purpose) |
|
5.0-inch Rocket Head Mk 5 Mod 1 (General Purpose) |
|
5.0-inch Rocket Head Mk 6 Mod 0 (General Purpose) |
|
5.0-inch Rocket Head Mk 6 Mod 1 (General Purpose) |
|
Overall dimensions and weight of fuze: |
|
Length |
4.22 inches |
|
Diameter (maximum) |
2.99 inches |
|
Body threads |
1.700 inches – 14 NS - 1 |
|
Weight |
2.6 lbs. approx. |
|
Applicable specification: OS 3388 |
|
General arrangement drawing: 393783 |
|
Sketch list of drawing & specs: 109204 |
|
Explosive components: |
|
A sensitive stab type compound Detonator Mk 23 (lead azide primer mixture, lead azide and tetryl) loacted in the shutter between the firing pin guide and the lead-in disc. |
|
A lead-in assembly charge (tetryl) located in the lead-in disc between the shutter and magazine. |
|
A booster charge (approximately 9 grams of tetryl) located in the magazine at the base of the fuze. |
| 2. Description |
|
General. Fuze Mk 149 Mod 0 was developed to replace the now obsolete Fuze Mk 148. Aerodynamically the external shape of the fuze is generally adaptable to the ogival configurations of the higher velocity rockets. The Fuze Mk 149 Mod 0 is used singly and in combination with the Base Fuze Mk 157 Mk 0, Mk 159 Mod 0, Mk 159 Mod 1, Mk 164 Mod 0, and Mk 165 Mod 0. A cap, which fits over the propeller on the nose of the fuze, makes the interior of the fuze waterproof and allows the fuze to be carried on the exter-ior of aircraft without the propeller assembly becoming badly iced. The fuze will fire su-perquick upon impact with suitable targets. Because of its basically rugged construction, it may be fired in the unarmed condition, when used in combination with base fuzes, and penetrate moderately thick steel plate and reinforced concrete without breaking up the fuze or head in a manner that would impair the effectivense of the round. |
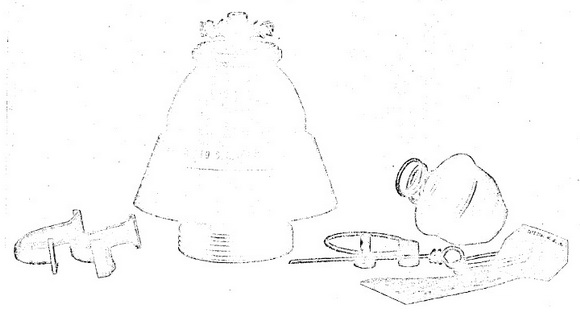
| Figure 24 – Nose Fuze Mk 149, External View, Full Size (approximately) |
 |
|
Use. The fuze is used in the 3.5-inch General Purpose Fin Stabilized Aircraft Rocket (Complete Round) Mk 8 Mod 0 and in the 5.0-inch General Purpose Fin Stabilized Aircraft Rockets (Complete Round) Mk 1 Mod 0, Mk 1 Mod 2, and the Mk 4 Mod 0 (See OP 1415). Fuze Mk 149 Mod 0 is effective against shipping, vehicles, personnel, moderatly heavy and light plate, fortifications, parked aircraft, buildings, and beach obstacles. |
|
Figure 25 – Nose Fuze Mk 149 Mod 0, Showing
the Clamp Pin, Clamp Bushing, Clamp, Gasket, Safety Wire, and Protective Cap. |
 |
|
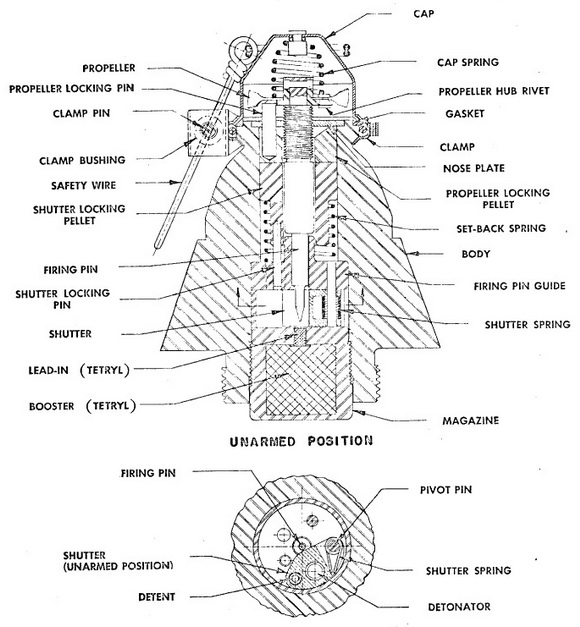
Functioning mechanism. The internal mechanism of the fuze is housed in a rugged conical steel body. The body cavity is closed at the base by the magazine containing the tetryl booster, and the forward end by the nose plate. The firing pin is threaded into the nose plate from the body cavity and extends forward out of the plate. A propeller hub is riveted to the forward end of the firing pin and a propeller is riveted to the hub. The fir-ing pin extends rearward, inside the fuze body, through the propeller locking pellet, shut-ter locking pellet, firing pin guide and into the shutter cavity where it holds a spring ac-tuated shutter in an unarmed position. This shutter, hinged on a pin pressed into the fir-ing pin guide, is loacted between the guide and the lead-in disc which holds the booster lead-in assembly. The shutter contains a spring loaded detent which locks the shutter to the firing pin guide when the shutter is in an armed position. A propeller locking pin, pres-sed into the propeller locking pellet, passes through a hole in the nose plate into a hole in the propeller hub and prevents the hub and propeller from the hub and propeller from turning until a setback force acting on the propeller locking pellet moves it rearward, against the force of a setback spring, and disengages the propeller locking pin from the hub. This setback spring holds the shutter locking pellet and propeller locking pellet against the nose plate until the round is launched. A shutter locking pin, pressed into the after end of the shutter locking pellet, extends into the firing pin guide at a position where it will lock the shutter in an unarmed position as the setback spring is compressed. The fuze is waterproofed at the forward end of the body by a cap assembly. The open end of the cap is pressed against a fiber gasket, called the outer gasket and held in this position by a clamp. The cap assembly consists of a cap, a cap spring, and cap rivet. The cap protects the propeller from damage during handling, the cap spring pushed the cap assembly and clamp away from the propeller during arming, and the cap rivet holds the spring in place and prevents the firing pin from turning to an armed position while the cap is clamped to the body. The clamp is made up of two half circular steel strips, hinged together. Each edge of each strip is formed to a channel shape that will pull the body and cap together as the clamp is closed and tightened. Each clamp arm, 180° away from the clamp hinge, is flanged away from the center of its half circle. These flanges are dril-led and held together by a clamp pin, a bushing and a safety wire. The clamp pin is sha-ped somewhat like a flat head rivet, the head being too large to go throuh the drilled holes of the clamp flange. Its shank has two holes drilled to match two holes in the bushing. After the clamp pin is placed in the clamp flange holes, the bushing is placed over the shank of the pin and a safety wire inserted in the outer hole of the bushing and pin. After loading the complete round onto the plane, the arming wire on the plane is pla-ced in the innermost hole of the bushing and then the safety wire is removed. |
|
Figure 26 – Nose Fuze Mk 149 Mod 0, Cross Section View, Unarmed Position |
|
|
|
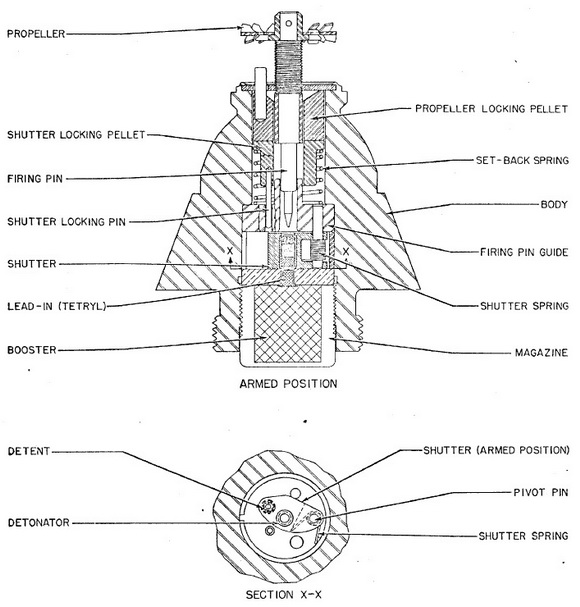
Figure 27 – Nose Fuze Mk 149 Mod 0, Cross Section, Armed Position |
|
|
| 3. Functioning |
|
Arming. When the rocket is fired, the arming wire is pulled from the clamp pin and bushing, allowing the clamp to open. The compressed cap spring then throws the cap and clamp away from the fuze. Inertia forces, incurred by acceleration, cause the two locking pellets to move rearward, thereby unlocking the propeller hub and interposing a shutter lock by means of the shutter locking pin. The firing pins is withdrawn from the shutter after eight revolutions which are accomplished in a short distance however, the shutter locking pin continues to hold the shutter in an unarmed position until the end of burning. At the end of burning, the setback spring forces the pellet forward, withdrawing the shutter locking pin from the shutter cavity, thus permitting the shutter spring to pi-vot the shutter against the shutter stop pin where it is secured in the firing position by the shutter detent. The firing pin, detonator, and booster lead-in are now in alignment and the fuze is fully armed. Because the shutter is locked in a safe position during acce-leration, arming will not occur until after acceleration. Observations indicate an arming delay of about 0.1 second after acceleration has ended. Therefore, the arming distance in the 3.5-inch AR1 will vary from about 425 feet to 900 feet, in 5.0-inch AR2 from 275 feet to 600 feet, and in the 5.0-inch HVAR3 from 650 feet to 1100 feet, depending upon the temperature at which the rounds are fired. Tests to determine the partial arming dis-tance, that is, the distance at which the firing pin has advanced completely, for rounds fired from aircraft, indicated that this distance is variable, ranging from about 5 feet to 65 feet. |
|
Firing. Upon impact, with a target offering sufficient resistance, the firing pin is driven rearward into the detonator after shearing the nose plate threads. The detonator initiat-es, consecutively, the booster lead-in and the booster. When the Fuze Mk 149 is used in combination with base fuzes, it is often launched "safe". In this case the nose cap re-mains in place and prevents the fuze from arming after the rocket is launched. |
|
Acceptance test data. |
|
1. Fired From Land Launchers. Completely loaded fuzes from each lot are installed in live loaded 3.5-inch or 5.0-inch aircraft rockets with an arming wire and Fahnestock clip attached and fired from a land launcher as follows: |
|
a. Half of the fuzes are fired for water impact. The rockets are fired at an angle of elevation of approximately 15 degrees. The temperature of the rocket motor at the time of firing is at least 60 degrees Fahrenheit. Only the 5.0-inch motor may be used with the 5.0-inch head for this test. |
|
b. The remaining fuzes are fired in the same manner except the angle of elevation is approximately 45 degrees. Any ambient temperature at the time of firing is sastisfactory. Either the 3.25-inch or 5.0-inch motor may be used with the 5.0-inch head for this test. |
|
Ninety percent perforance of all test samples in this group is satisfactory. Any prema-tures cause rejection of the lot. |
|
2. Fired From Plane. Completely loaded fuzes from every tenth lot are fired from air-craft for water or ground impact. The angle of fall is at least 15 degrees. Half of the fuzes are assembled in 3.5-inch live loaded aircraft rockets and the balance are assemb-led in 5.0-inch live loaded aircraft rockets for this test. The prescribed service arming wire arrangement is used. Half of the samples of each caliber are fired for ground impact. A minimum of 87½ percent perforance of all test samples is considered satisfactory. Any premature is cause for rejection of the lot. |
|
Sensitivity limits. Sensitivity data is not complete for this fuze, however, it will pro-bably fire consistently on three-sixteenths inch mild steel plate at 0° obliquity, and when aircraft launched, will also fire on ground or water impact when the angle of fall is 15 de-grees or greater. |
| 4. Safety Features |
|
Detonator safety. This fuze is detonator safe. When the fuze is unarmed, the deto-nator is held positively out of line with the booster lead-in by the firing pin which protru-des into the shutter cavity and holds the shutter in an unarmed position. The firing pin cannot be withdrawn from the shutter cavity until the protective cap is removed, and cannot be rotated out of the shutter cavity until setback takes place. The shutter can-not move the detonator pin in line with the lead-in until the propeller has turned the fir-ing pin out eight revolutions and, finally until setback has ceased and the setback spring has moved the shutter locking pin out of the shutter cavity. |
|
During shipping and stowage. Sample fuzes from production lots are subjected to rough handling test which are considered to be more severe than conditions encountered during normal shipping and stowage. Failure to pass these tests shall be cause for re-jection of the lot. The propeller cannot turn the firing pin out of the shutter cavity as long as the nose cap is in place. If the nose cap should become accidentally removed from the fuze, it would be necessary for a prolonged setback to take place at the same time that a turning force was applied to the propeller in order to arm the fuze. |
| 5. Disposal and Servicing (Maintenance) |
|
General. If the fuze is accidently armed, whether assembled in the rocket head or not no attempt should be made to unarm it. If the fuze is armed, turning the propeller counterclockwise as viewed from the nose will cause the firing pin to pierce the detona-tor and explode the booster. The fuze is safe as long as the cap assembly is held in place by the safety wire, or by the arming wire. If the cap assembly comes off by acci-dent, the fuze is still safe as long as the propeller is engaged by the propeller locking pin. This can be determined by visual inspection. The fuze shall be considered armed if the propeller is out of engagement with the propeller locking pin so that the propeller is free to rotate. Armed fuzes must not be fired from rocket launchers. If the fuze is an as-sembled round is armed inadvertently, the propeller should be carefully taped to prevent further rotation and the fuze then carefully unscrewed from the rocket, taking care not to drop the round or the fuze on its nose or strike the fuze in any way. This work should be done by Explosive Ordnance Disposal Personnel if available. The armed fuze should be disposed by gently lowering into deep water or by the most fensible means, as determi-ned by the circumstances. If for any reason the cap has been removed from the fuze, but visual observation reveals the fuze to be intact and the propeller positively locked by the propeller locking pin, then the propeller may be securely taped, and the fuze returned to storage. Carefull handling will be necessary, however, to avoid propeller damage and future usage will be limited to ground or shipboard launching. |
|
Disassembly. Disassembly of this fuze is not permitted except at authorized activi-ties when directed by the Bureau of Ordnance. |
| 6. Installation Instructions |
|
1. After the motor has been assembled to the head, remove the nose plug from the rocket head and inspect the fuze seat liner. Clean if necessary. Make sure that the auxi-liary booster is present in the bottom of the liner. |
|
2. Remove the fuze from the container and inspect for damage. Check the cap and clamp assembly for corrosion. If slight corrosion exists, grasp clamp and rotate it around body so that it sliders freely on body and cap. If the cap and clamp are badly corroded, it is best not to use the fuze. If considered necessary a light coat of vaseline may be applied to the clamp assembly to aid in the preventation of corrosion and icing. If the fuze is defective, repack, and return it to an ammunition depot. |
|
3. Install the fuze into the rocket head using the proper fuze wrench. Be sure that both fuze and fuze adapter are seated properly. |
|
4. After the assembled round is loaded on the launcher, turn the clamp so that the clamp pin and bushing are on the same side of fuze as the arming wire. Insert the arming wire in the hole provided next to the safety wire. Remove the safety wire. DO NOT REVERSE THIS ORDER. Save the safety wire for reinsertion if the round is not fired. |
|
5. Put one Fahnestock clip on the free end of the arming wire and slip it against the clamp bushing. Adjust so that there is just enough slack in the arming wire, between the arming wire release latch (on the aircraft) and fuze, to insure that the arming wire re-taining plate does not get pulled out of the catch in the arming wire release. Leave no more slack than necessary. |
|
6. Clip the arming wire off a about two or three inches beyond the Fahnestock clip and dress the wire for burr removal. |
|
Removal from round. |
|
1. Before remvoing the round from the launcher, insert the safety wire in its hole in the clamp bushing. It may be necessary to squeeze the bushing and pin assembly longi-tudinally with pliers to line up the holes. After the safety wire is in place, remove the arming wire. DO NOT REVERSE THIS ORDER. |
|
2. Remove the round from the launcher and unscrew the fuze. Examine the cap and clamp assembly for damage or moisture. Wipe off the clamp if moist or corroded. Replace the shipping plug in the head. |
| 7. Packing and Marking. |
|
Packing. Fuzes Mk 149 are packed in individual, sealed, metal containers. Twenty-four fuzes are packed in a wood box 26 inches by 16½ inches by 6 1/3 inches which re-presents 1.6 cu. ft. and a total weight of 96 pounds. |
|
Marking. The fuze is marked to show the letters NF, the mark, mod, lot number, ma-nufacturer's initials, date of loading, symbol of loading plant, and the anchor stamp. |
|
|