|
|
| DEPTH CHARGES MARK 6 and MARK 7 |
| PART II |
| CHAPTER VI - REPAIRING AND OVERHAULING |
|
MARK 6 PISTOL CALIBRATION |
|
6. To calibrate a Mark 6 pistol, proceed as follows: |
|
(a) Set the index pointer on the pistol at the 100-foot mark. Place the pistol in the test-ing set and determine the firing pressure as directed in Chapter V. |
|
(b) Remove the pistol from the testing set and cock the firing plunger. |
|
|
|
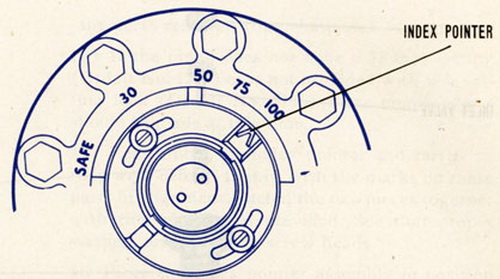
Depth index pointer set to 100. |
|
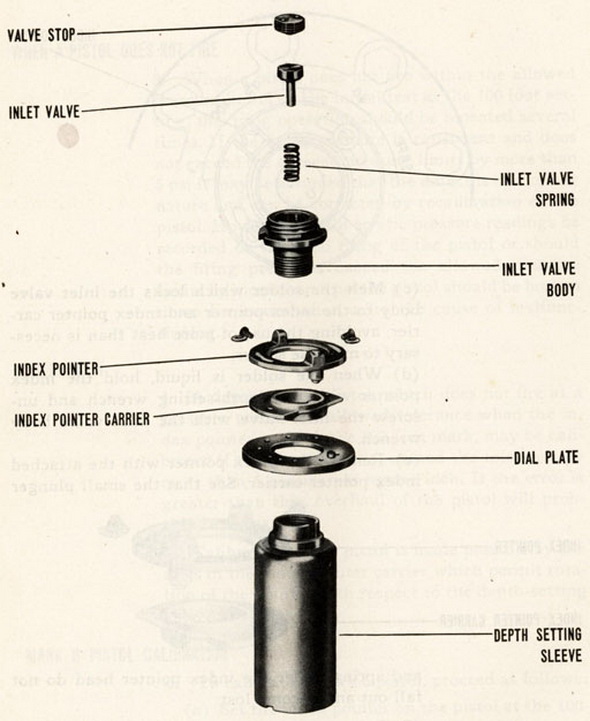
(c) Melt the solder which locks the inlet valve body to the index pointer and index poin-ter carrier, avoiding the use of more heat than is necessary to melt the solder. |
|
(d) When the solder is liquid, hold the index pointer with the depth-setting wrench and unscrew the inlet valve with the inlet valve body wrench. |
|
(e) Remove the index pointer with the attached index pointer carrier. See that the small plunger and sping under the index pointer head do not fall out and become lost. |
|
|
|
(f) Take out the two screws that secure the index pointer to the index pointer carrier and separate these pieces. It will probably be necessary to use heat to melt the solder that holds these parts together. Clean off all of the solder remaining on the parts remov-ed from the pistol. |
|
|
|
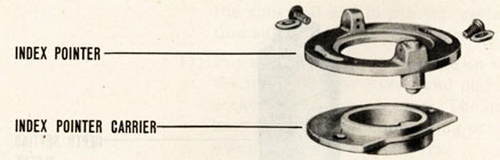
Pistol parts. |
|
(g) If the pistol does not have a 75-foot setting (Ordalt No. 1254) or is not provided with safe setting lock (Ordalt No. 1735) these modifiaction should be made at this time. |
|
(h) Reassemble the index pointer and carrier as they were before; that is, with the marks on these parts in alignment. Fasten the two pieces together with the two screws provi-ded. See that porper washers are under the screw heads. |
|
(i) Place the index pointer assembly in position on the depth-setting sleeve. If the sleeve has not been disturbed, the index pointer will point at the 100-foot mark. If the sleeve has been disturbed, move the index pointer back to this mark. |
|
(j) Remove the index pointer assembly and reassemble it with the spring and plunger in place in the index pointer. This can be done as follows: |
|
(1) Stand the pistol on the centering flange. |
|
(2) Place the plunger in a vertical position with the spherical end in the dial plate in-dentation adjacent to the 100 foot mark. |
|
(3) Put a little grease or vaseline on the end of the index plunger spring and place it in the socket in the index pointer. The gerase will keep the spring from dropping out when the index pointer is turned over. |
|
(k) Place the index pointer assembly on the pistol and lower it gently into position. If the hole in the pointer (now occupied by the spring) is in line with the plunger, the parts will go together. If they do not go together, move the index pointer a trifle and try again. It is important that the plunger stay in a vertical position during this re-assembly. When the index pointer is properly assembled, replace the inlet valve assembly. |
|
(l) The pistol will now be in the same condition as it was before the disassembly except that the parts formerly locked together with solder will now be free. |
|
(m) Loosen the two index pointer screws. Hold the index pointer at the 100-foot mark and, by means of the two screws, rotate the depth-setting sleeve a small amount clock-wise if the firing pressure was less than 40 psi or counterclockwise if the firing pressure was greater than 49 psi. |
|
(n) Tighten the index pointer screws and test the pistol to determine the new firing pres-sure. |
|
(o) Repeat the foregoing procedure until the firing pressure is a close to 44.5 pounds as possible and is within the specified limits (40 to 49 psi). |
|
(p) Tighten the index pointer screws and turn the index pointer to SAFE. Test the pistol with the index pointer at the 30-foot mark as a final check on the calibration. The pres-sure required to fire the pistol at the 30-foot mark is 10 to 15 psi. No adjustment is pro-vided for calibrating the pistol at the 30-foot setting. |
|
(q) Cock the pistol and leave it cocked. Lock the inlet valve body and the index pointer screws to the index pointer with spots of solder. |
|
|