|
|
| HANDBOOK OF ENEMY AMMUNITION |
| PAMPHLET No. 13 - SMALL ARMS TRAINING |
| Volume I - Grenade |
| LESSON 7. - THE S.T. GRENADE |
| Instructor's Notes: – |
|
Stores. – 1 instructional S.T. grenade complete for instruction and each man. Drill grena-des can be improvised by sandbags on wooden handles. |
|
1. Explain:– |
|
This grenade has been introduced for use against A.F.Vs. It is designed to stick to the target. The grenade will NOT stick on a sloping surface should it be wet, muddy, or oily. The grenade is suitable for use at road blocks, positions of ambush or for dropping from upstairs windows on to tanks. Althrough it can be thrown short distances, far better ef-fect will be gained when the grenade is used as a portable demolition charge and planted by hand on vulnerable points of A.F.Vs., or loopholes or doors of pill-boxes. For night raids on tank harbours the grenade is a useful weapon. Weight 2¼ lb. |
|
Safety precaution – Ensure that the grenade is not primed. |
|
2. Description |
|
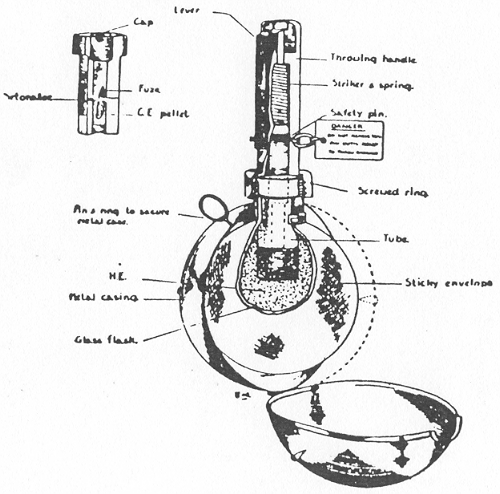
Explain and demonstrate, squad imitiating (see Fig. 17) – |
| i. |
The body of the grenade consists of a flask filled with high explosive. To protect the grenade before use it is completely enclosed by a metal casing, hinged at the bottom and held in position round the neck of the flask by a pin or clip. The flask is covered with a sticky envelope to cause it to stick. Inside the neck of the flask is a tube to hold the detonator assembly. Before insertion, the neck is closed by woo-den and rubber discs held in position by a screw cap. |
| ii. |
The throwing handle is attached to the neck of the flask by a screwed ring. The handle contains the striker and the striker spring, held in position by a lever fitting flash with the side of the handle and, in its turn, held securely in position by a safety pin. A label is attached to the safety pin. |
|
Note. – Before use a striker test, similar to that for the No. 36 grenade, must be carried out. |
| iii. |
The detonator assembly consists of a percussion cap, 5-seconds fuze, detonator, and a C.E. (composition exploding) pellet. |
| iv. |
Question squad. |
|
Fig. 17 |
|
|
| 3. To prime the grenade |
| Explain and demonstrate, squad imitating: – |
| i. |
Unscrew the neck screw cap, remove and discard the wooden and rubber discs. Take a detonator assembly and remove the cardboard sleeve projecting the C.E. pellet. Place the detonator assembly, pellet first, into the tube; the rubber rings on the assembly will hold it firmly in position. Attach the handle of the grenade to the neck of the flask by screwing the ring up tight. If this is found impossible, try ano-ther handle. |
| ii. | Practise squad. |
| 4. Mechanism |
| i. |
Explain when the safety pin is withdrawn, the striker is still held in position so long as the hand grips the lever. On throwing the grenade, the spring forces the striker down and fires the cap, the lever flying off. The cap ignites the fuze, which burns for five seconds, exploding the detonator which sets off the C.E. pellet, thus ex-ploding the grenade. |
| ii. | Question squad. |
|
5. Use |
|
Explain and demonstrate: – |
|
The outer casing must be removed by pulling the pin or clip (NOT the one with marked "DANGER") with the grenade hanging down, when the casing will fall off. To use, pull out the safety pin, gripping the lever firmly against the handle with the fingers. It is difficult to throw the grenade accurately any distance. Far better results will be obtained by planting it on the object when circumstances permit. This must be done with sufficient force to break the flask. The lever must be released sharply. By moving about ten yards away the user is safe from the effects of the explosion. |
| 6. Packing |
|
S.T. grenades are packed in metal cases holding 5 grenades and handles. Detonator as-semblies are packed separately in cardboard tubes, 5 in a tube. A tube of 5 should be placed in the spring clips provided for the purpose on the inside of the lid of the box of grenades. |
|
|