|
|
| HANDBOOK OF ENEMY AMMUNITION |
| PAMPHLET No. 13 - SMALL ARMS TRAINING |
| Volume I - Grenade |
| LESSON 6. - THE No. 73 ANTI-TANK GRENADE |
| Instructor's Notes:– |
|
Stores. – Instructional grenades and detonators for instructor and each man; drill grena-des for throwing. Where no drill grenades exist may suitable object of the same size and weight e.g. a quart oil tin filled with sand will do. |
|
Safety precaution. – Ensure that the grenade is not primed. |
|
1. Explain:– |
|
The object of the grenade is to damage armoured fighting vehicles, the best effect being obtained when used against the track or suspension of a tank. Owing to its weight and shape it can be thrown only quite short distances, 10-15 yards. The powerful nature of the grenade makes it absolutely essential that the thrower is behind cover. The use of it, therefore, is limited to ambushes of for road blocks. Weight, approximately 4 lb. |
|
2. Description |
|
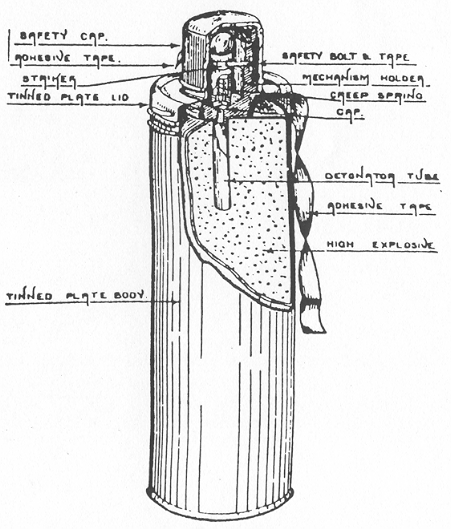
Explain and demonstrate (see Fig. 16):– |
| i. |
The grenade consists of a tinned-plate casing, with a screw-on tinned plate lug at the top. In the centre of the lid is fixed a mechanism holder, containing exactly the same mechanism as the No. 69 grenade and covered by a safety cap. The body of the grenade is filled with high explosive and painted buff. |
| ii. |
Question squad. |
|
Fig. 16 |
|
|
| 3. To prime the grenade |
| Explain and demomstrate, squad imitating:– |
| i. |
Remove the adhesive tape from the rim of the tinned-plate lid. Inscrew the lid, keeping the safety cap on. On the under-side of the lid is a tube. Unscrew this from the lid and inspect it to ensure it is free from obstruction. Insert the detonator into this tube, closed end first, e.g. open end to the detonator to open end of tube. Screw tube with detonator back on to the lid. Screw the lid firmly back on to the grenade, being careful to insert the detonator tube centrally into the hole in the explosive. The grenade is now ready for use. |
|
Note. – Should the lid be found to jump the threads of the canister when screwing it down, strips or paper, flannelette, or tape should be placed on the threads and the lid screwed down over them. |
| ii. | Practice squad. |
| 4. Mechanism |
| i. |
Having removed the safety cap, the safety tape is kept in position by the fingers. When the grenade is thrown, the weight at the end of the tape causes it to un-wind, thereby withdrawing the safety bolt. Only the creep spring is now holding the striker apart from the cap. On impact, the striker overcomes the creep spring, fires the cap which sets off the detonator. This explodes the grenade. |
| ii. |
Question squad. |
| 5. To thrown the grenade |
| Explain and demonstrate, squad imitating: – |
| i. |
Having removed the adhesive tape on the safety cap, remove the safety cap. Lay the grenade along the forearm with the mechanism holder in the hand, keeping a finger on the safety tape to prevent it unwinding. Throw the grenade with an over-arm bowling action and duck below the cover at once. If used on soft ground, throw well into the air to ensure functioning. |
| ii. |
Practice squad from behind cover. |
| 6. Care and packing |
| i. |
The H.E. filling must not be exposed to moisture. It is also inflammable, therefore the grenade should not be stood near a naked flame. This grenade is very sensitive to small arms fire whether primed or not and should, therefore, be kept under cover if possible. |
| ii. |
The grenades are packed in a tin box, ten is a box; also ten detonators in a cylin-drical container in the same box. |
|
|