|
|
| HANDBOOK OF ENEMY AMMUNITION |
| PAMPHLET No. 13 - SMALL ARMS TRAINING |
| Volume I - Grenade |
| LESSON 5. - THE No. 69 GRENADE |
| Instructor's Note:– |
|
Stores. – Instructional No. 69 grenade and detonator for instructor and each man; drill grenades for throwing. Any suitable object will serve as a drill grenade, e.g. stones, weighted wood, etc. |
|
1. Explain:– |
|
This grenade is a light hand percussion grenade for offensive action. The area of burst is very limited and it can, therefore, be thrown standing in the open. The material effect is small but moral effect is considerable, particularly at night since each man, thinking H.E. grenade has been thrown, belleves himself (in the darkness) to be the only one left alive. It is of special value for patrols. Weight about ¾ lb. |
|
Note. – The grenade can also be used for adding realism to exercises with troops. When thus used, 69 grenades should be thrown behind rather than in front of troops, and pre-ferably behind banks and into ditches, as the lead ball is liable to fly out and cause inju-ries. These grenades will never be thrown at advancing troops, nor will they be used at night for training pruposes. They must be regarded as having a danger area of 30 yards. |
|
2. 1st safety precaution |
|
Explain and demonstrate, squad imitating:– |
|
Remove the base plug and ensure that the grenade is not primed. |
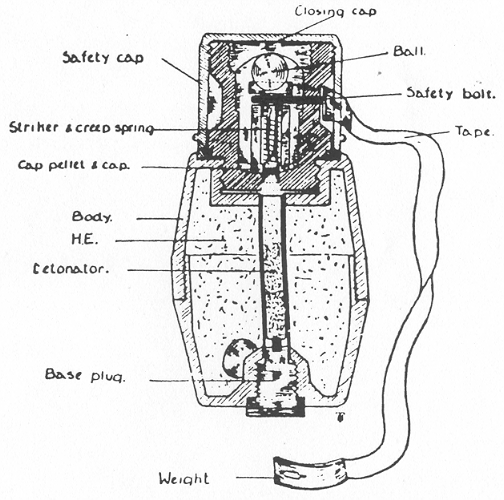
| 3. Description |
| i. |
Explain and demonstrate where necessary (see Fig. 15): |
|
Live grenades are issued ready for use except for priming, and in no circumstances will they be stripped. The body is made of bakelite and is filled with H.E. The safety cap is held securely by a piece of adhesive tape. To remove the safety cap pull off adhesive tape and unscrew a half-turn. Further turning may unwind the safety tape underneath. Below the safety cap is a mechanism holder containing a ball, striker, and creep spring, and a cap holder with a cap. A safety bolt passes through a hole in the striker and one in the mechanism holder, thus keeping the striker in position. To this bolt is attached a lenght of tape, on the other end of which is a lead weight. Through the centre of the grenade is a sleeve for the detonator. |
|
| ii. |
Question squad. |
|
Fig. 15 |
|
|
| 4. To prime the grenade |
| i. |
Explain and demonstrate, squad imitating. |
|
Remove the base plug. Examine the detonator sleeve to ensure that it is free from obstruction and rough edges. |
|
|
Insert the detonator open end first. Replace the base plug, ensuring that it is screwed fully home. |
|
| ii. |
Practice squad. |
| 5. Mechanism |
| i. |
Explain:– |
|
After the safety cap is removed the safety tape must be held in position by the fore-finger and thumb. When thrown, the weight causes the tape to unwind and pull out the safety bolt. Only the creep spring is now holding the striker away from the cap. On impact, the striker is forced against the cap, igniting the detonator and exploding the grenade. |
|
| ii. |
Question squade. |
|
6. Throwing |
|
Explain and demonstrate:– |
|
Any convenient method of throwing may be used, overarm bowling as taught or a lob. If lobbed for short distances, a twist or a spin should be given to ensure that the tape fully unwinds and falls clear. |
|
Ready – Pick up the grenade, remove the adheisive tape. Hold the grenade in the hand, base plug downwards. Face the target, turn to the right. |
|
Throw – With a turn of the hands, remove the safety cap, care being taken that the fore-finger and thumb keep the tape on the grenade, and throw as required. |
|
7. Practice squad in trowing. |
|
8. Packing |
|
Explain:– |
|
Grenades are packed 34 in a box, with two boxes each containing 17 detonators. |
|
|